Configuring authentication with O365 via OAuth
![]() Updated 1 year ago
by
admin
Updated 1 year ago
by
admin
This document describes how to configure OAuth for user authentication with Office 365 accounts.
Video Guide.
Below is a video guide on how to configuring authentication with O365 via OAuth.
Step-by-Step Guide.
Below is the step-by-step guide on how to configuring authentication with O365 via OAuth.
- Log in to Office 365 as an administrator. You must use an account with administrative access to your organisation’s Office 365 subscription.
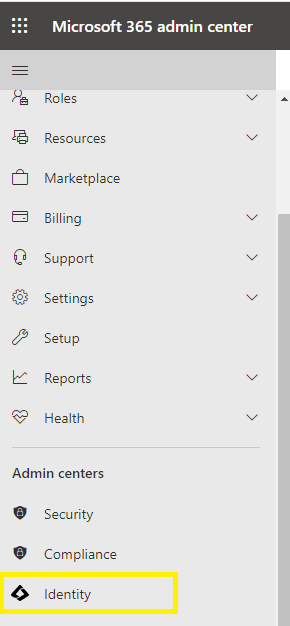
- Navigate the long menu to find the link to the Identity icon. This will open up the Entra ID admin centre.
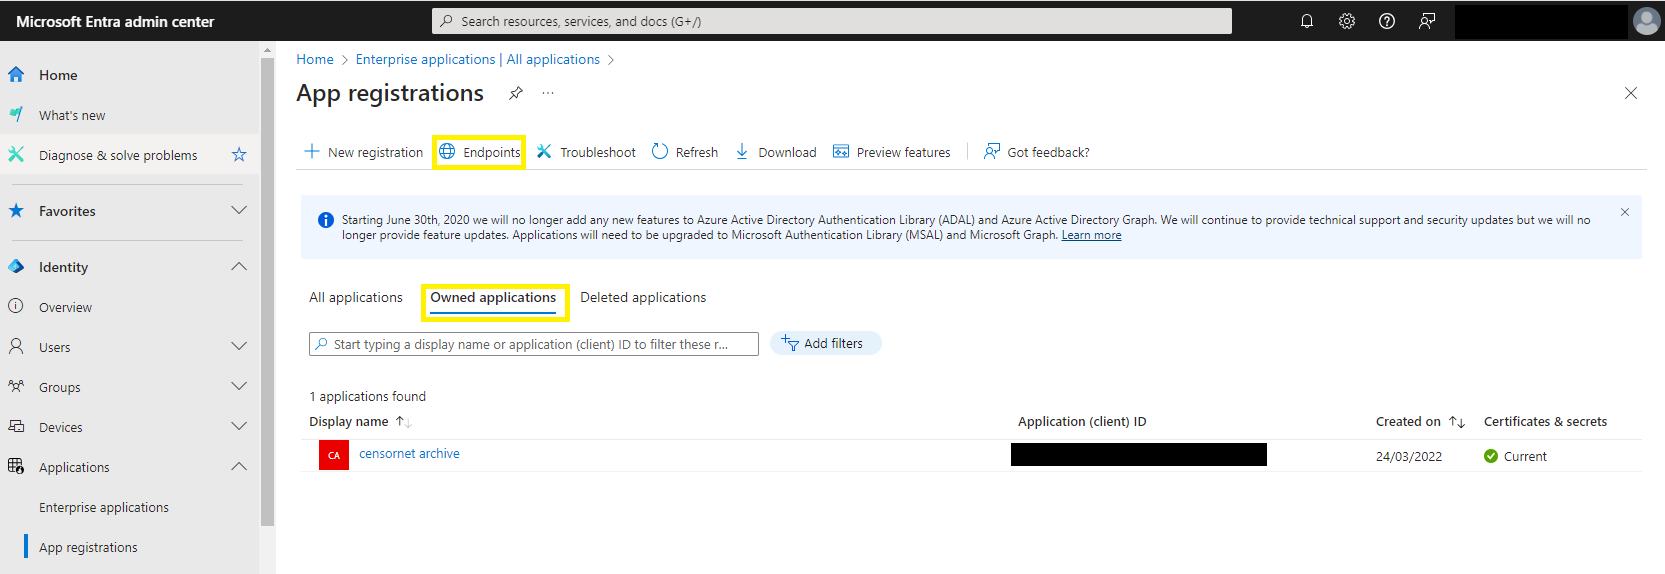
- Open the App Registrations section. Any existing applications will be listed here. There are 2 important areas – the App Registrations list and Endpoints.
 You may already have an application that is already being used for OAuth / SSO purposes – and you could edit this for rather than adding a new application. However, this article will provide instructions for creating a new registration.
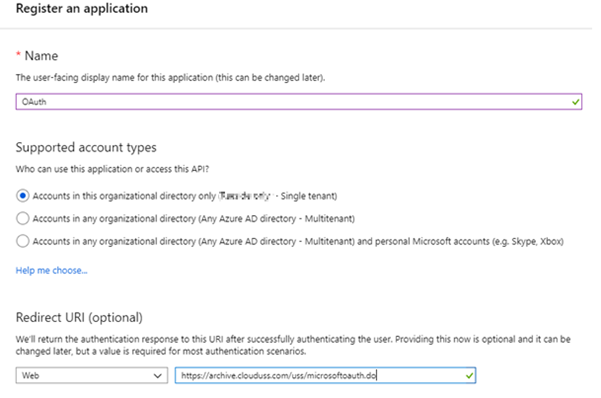
 - Click New registration and enter the following details:
- A Name (e.g. Email Archiving)
- The type should be set to Web app / API
- A sign-on URL – this is known as the “Reply URL”. For the Email Archive system, this MUST be in the following format:
- EU Environment =
https://archive.clouduss.com/uss/microsoftoauth.do - UK Environment =
https://uk.archive.clouduss.com/uss/microsoftoauth.do
- After adding the App Registration, you can configure Reply URL entries – each one corresponding to additional web apps that you are granting SSO access to:
The URLs below are for customers using the EU Archive environment. - EU Environment =
https://archive.clouduss.com/uss/microsoftoauth.dohttps://archive.clouduss.com/cryoserverv9/microsoftoauth.dohttps://www.archive.eu.clouduss.com/uss/microsoftoauth.dohttps://www.archive.eu.clouduss.com/microsoftoauth.dohttps://app.archive.eu.clouduss.com/user/ms-loginhttps://<your company tag>.outlook.archive.eu.clouduss.com/user/ms-login
The URL's below are for customers using the UK Archive environment.
https://uk.archive.clouduss.com/uss/microsoftoauth.dohttps://uk.archive.clouduss.com/cryoserverv9/microsoftoauth.do-
https://www.archive.uk.clouduss.com/uss/microsoftoauth.do https://www.archive.uk.clouduss.com/microsoftoauth.dohttps://app.archive.uk.clouduss.com/user/ms-loginhttps://<your company tag>.outlook.archive.uk.clouduss.com/user/ms-login

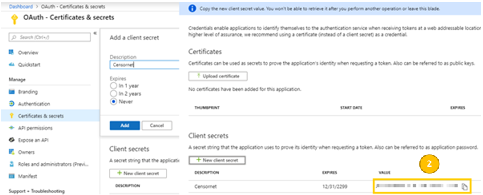
- Next, you must create the Secret Keys. It is critical that a remote application can acknowledge an encrypted message sent from the OAuth provider (Azure AD). It will do this by decrypting the message using a secret key. If this fails, the message will be rejected. Secret Keys are only displayed on-screen ONCE and once only – so you must securely make a note of the secret key straight away. Enter a Name for the key and select a Duration of your choice.
- Next, you must configure Endpoints The Email Archive system login (initiated via the user’s web browser) will need to know where to redirect the user to perform the OAuth sequence – and where to obtain the users account details. These are known as “endpoints” and are web service URLs.If you have set up an Azure AD hosted “developer application”, then these URL’s are common, fixed URLs and can be left blank on the Email Arche side. However, for the app registration described in this article, we will need to obtain 3 specific endpoints.Endpoints are defined for your organisation’s Office 365 subscription, not per app registration. Therefore, you will need to navigate back to the list of App Registrations panel – and at the top, you will then see the link to Endpoints.The 3 entries in the Endpoints list are needed by the Email Archive system, as identified here:
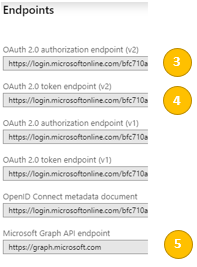
- You should have now collected the 5 pieces of information highlighted in the screenshots above. These are required to configure the Email Archive system later in this article.
- Next, the Permissions must be set for the newly created App Registration.
- Within the newly created app, click the API Permissions tab
- Click on Add a permission - this will show a large panel with multiple API’s for which permissions can be granted.
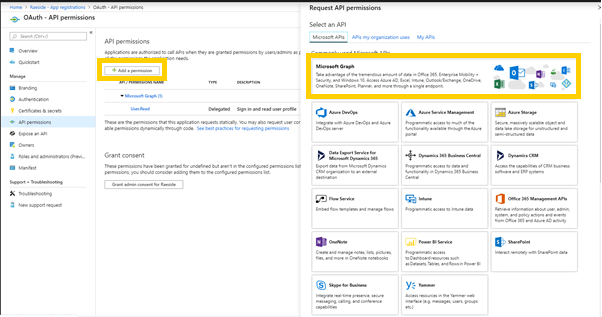
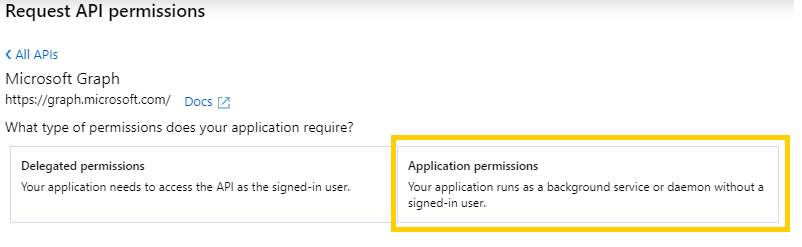
- Select the Microsoft Graph API block, and then you will be offered two types of permissions – Delegated (which correspond with an individual user’s permission after an OAuth login for that user), or Application (which is a general permission for applications connecting using this Client ID). Select Application Permissions.
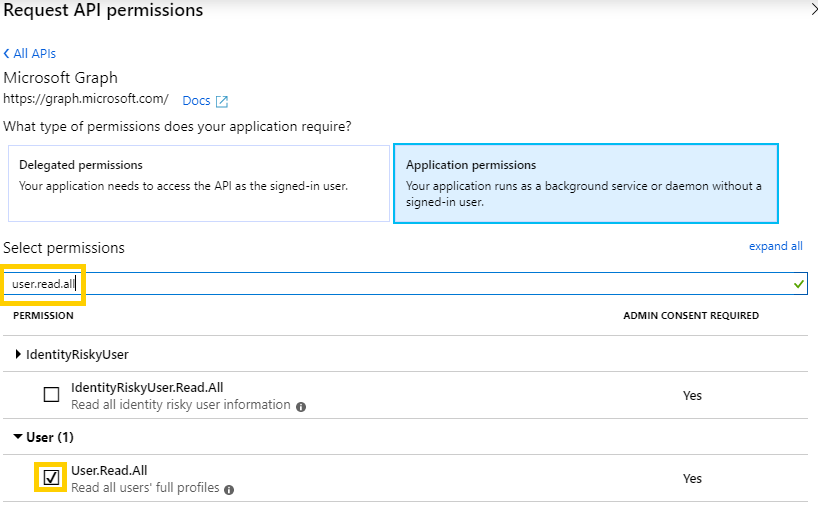
- From the list of permissions, either scroll down or type into the search box the term
User. Select theuser.read.allpermission.
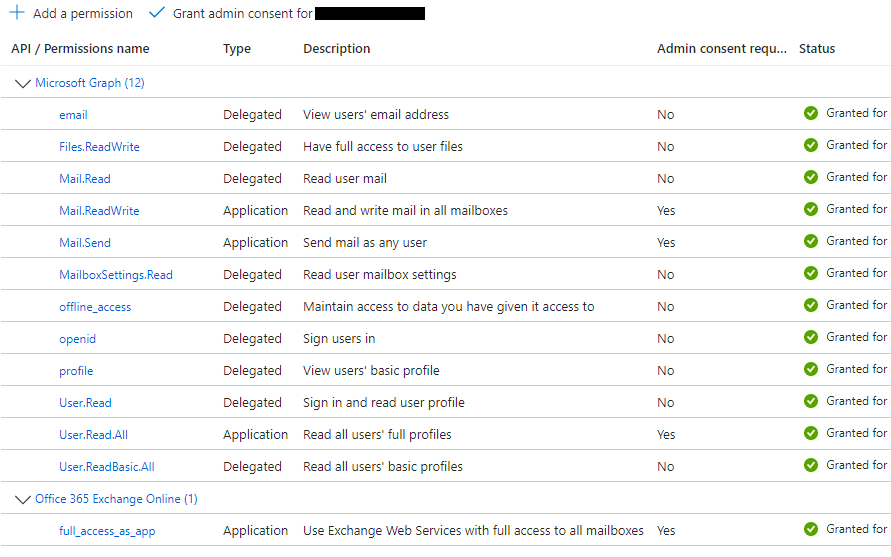
Ensure you add all the permissions as per the screenshot below.
- Click the Add Permissions button at the bottom of the panel.
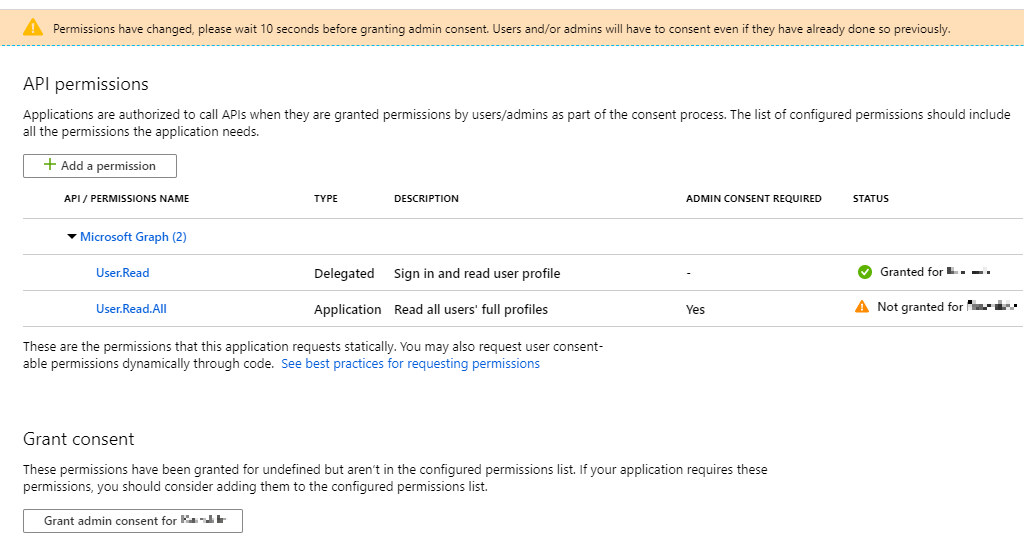
- After this, you will be returned to the main panel, where you will see that a final “Grant” action is still needed:


- Log in to the Email Archive system as an Administrator (if this role has not been enabled for your environment, please contact your service provider for assistance).
- Under the Adv. Configuration menu, look for the SSO OAuth menu option.
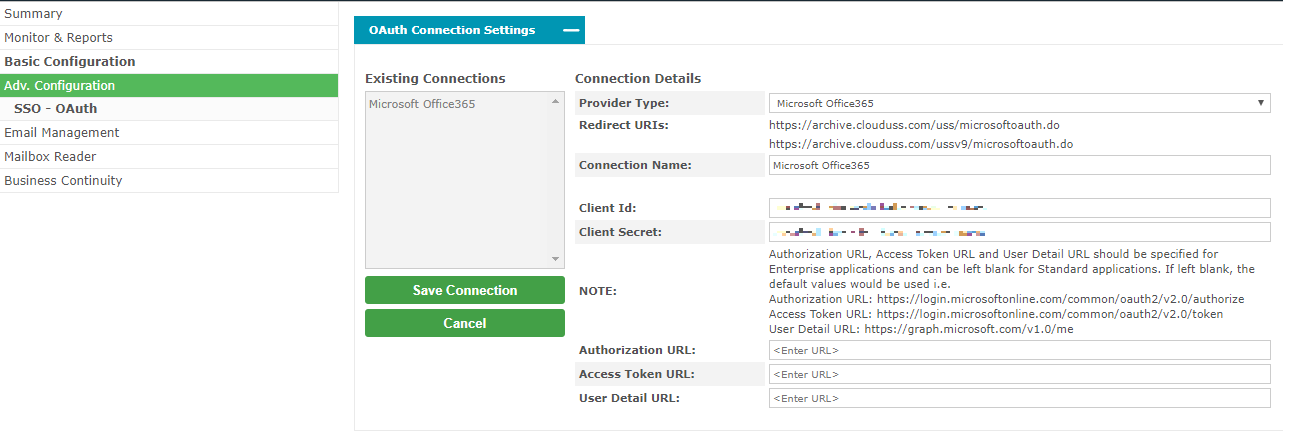
- To create the OAuth entry click Create New Connection (you will need the 5 pieces of information from earlier in this article to continue). Enter the 5 pieces of information into the form, as shown below:

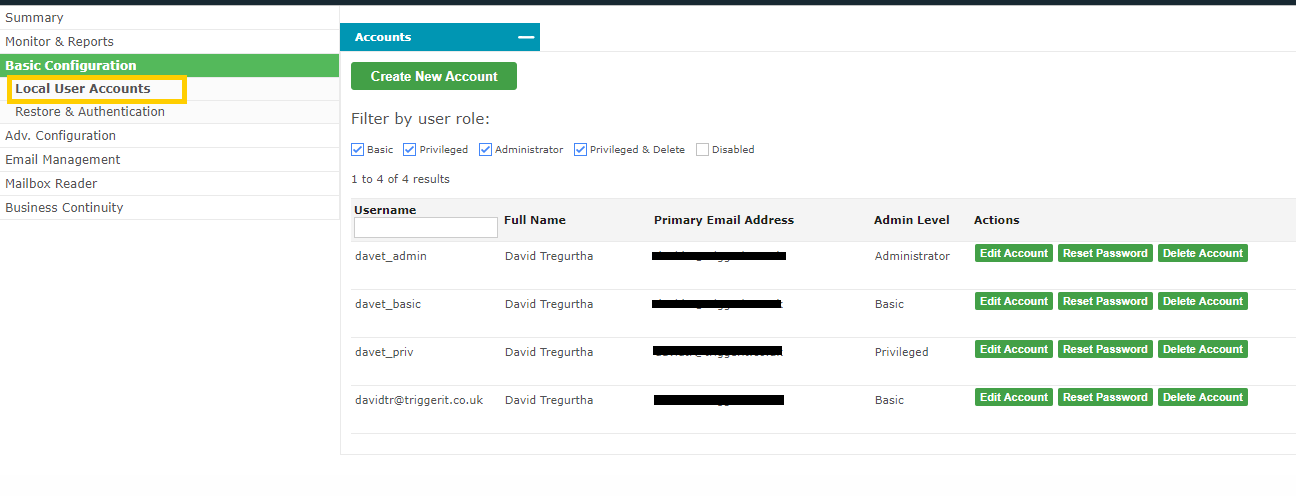
- Configuration is now complete Local User Accounts for OAuth When a user accesses the Email Archive for the first time using OAuth, it will create a Local User Account entry within the Email Archive system. This account will mirror their details extracted during the OAuth login phase (as obtained from “Azure AD - Graph API”). This is true even if LDAP connectivity is available. I.e. Any LDAP connectivity established between a customer and the Email Archive system is not referenced during OAuth login. To review the accounts created by OAuth logins, visit the Basic Configuration > Local User Accounts section. The Office 365 accounts will show the user’s email address as their username. They will be set to “external authorization” (meaning that their password is not held in the Email Archive so it must be validated with some external system).