Configuring RADIUS Protection
![]() Updated 6 years ago
by
admin
Updated 6 years ago
by
admin
This document is intended for the cloud MFA administrators.
This section describes the configuration steps you must perform if you have installed the optional SMS PASSCODE RADIUS Protection component to achieve SMS PASSCODE multi-factor authentication for your RADIUS clients.
Configuring RADIUS Protection on a Windows Server
This section describes how to set up the connection between your RADIUS clients and the NPS server (if not already done beforehand). After this, SMS PASSCODE multi-factor authentication should work out-of-the-box, for the configured RADIUS clients, using default settings for the SMS PASSCODE RADIUS Protection component. Please follow the procedure below:
- Configure all RADIUS clients in the usual way by specifying the NPS server as the RADIUS server. If you are in doubt how to perform the configuration, please refer to the configuration guide of the specific RADIUS client in question.
- Start the NPS Management Console:
- Select Run… in the Windows Start menu
- Enter
nps.msc - Click OK
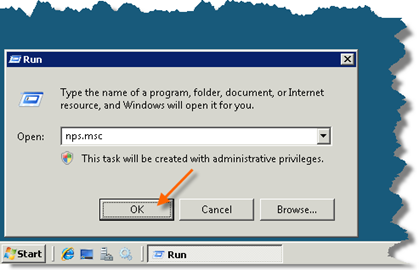
- The NPS Management Console is shown.
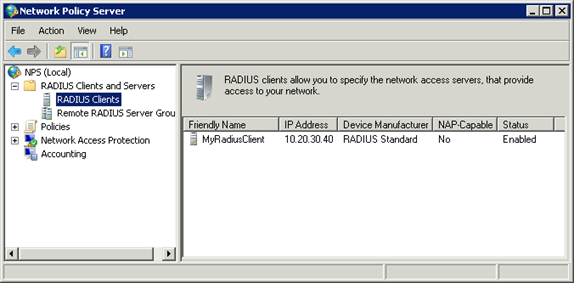
- Now you must create all your RADIUS Clients in the NPS Management Console. If these have already been created beforehand, you can skip to step 9.
- To create a RADIUS Client:
- Right-click the RADIUS Clients node.
- Select New RADIUS Client.
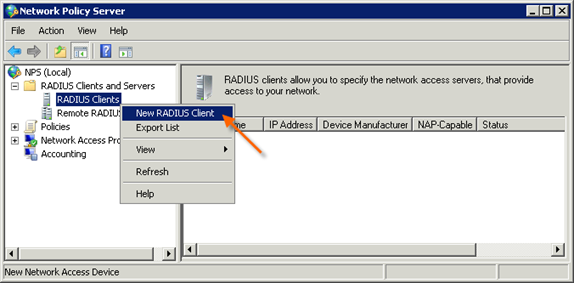
- The New RADIUS Client dialog appears.
- Enter a “friendly name” of the RADIUS Client.
- Enter the IP address of the RADIUS Client.
- Enter and confirm the Shared Secret. It must match the shared secret configured on the RADIUS Client.
- Click OK.
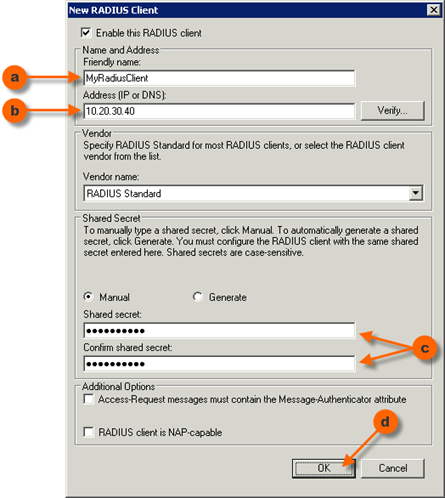
- The RADIUS Client that you have created will appear in the right-hand pane:
- Repeat steps 5-7 if you need to create more RADIUS Clients.
- This completes the standard configuration of RADIUS authentication using SMS PASSCODE. Please test each RADIUS client to make sure that RADIUS authentication works as expected.
Advanced Configuration of the RADIUS Protection Component
This section describes, how you can maintain advanced settings of the SMS PASSCODE RADIUS Protection component.
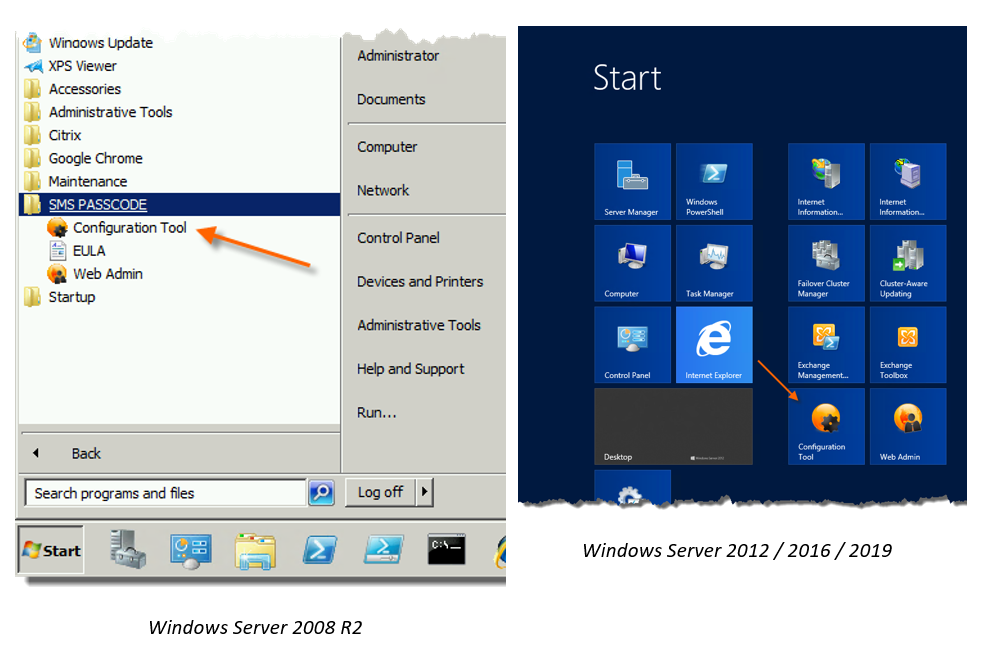
To maintain such settings, you need to start the SMS PASSCODE Configuration Tool, which is available via the Windows Start Menu.
After opening the SMS PASSCODE Configuration Tool from the Windows Start Menu:
You will see a number of tabs. Select the RADIUS Client Protection tab to configure the advanced RADIUS settings:
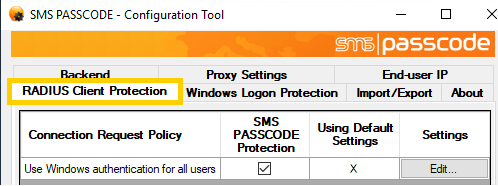
On the RADIUS Client Protection tab, you will see a table of the Connection Request Policies (CRPs) that currently exist in the NPS:
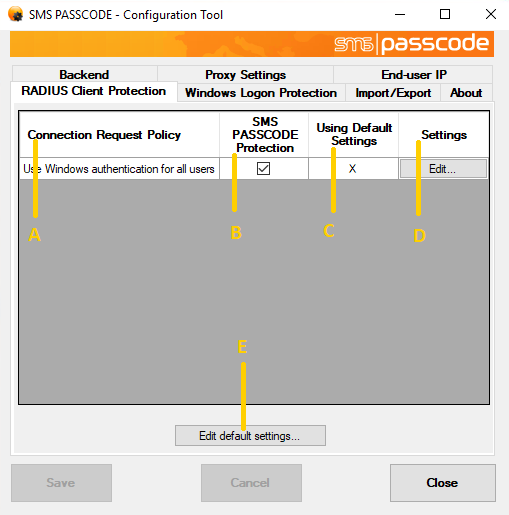
The columns of the table are explained below:
| Explanation |
(A) | Column (A) lists the names of all the CRPs that currently exist in the NPS. Whenever you create or delete CRPs in NPS, such changes are automatically reflected in the Configuration Tool (when you restart it). NOTE: It is NOT recommended to rename CRPs in NPS. A renamed CRP will be treated as a new CRP in the SMS PASSCODE Configuration Tool, meaning any previous CRP-specific SMS PASSCODE settings will be lost. |
(B) | Column (B) specifies, whether the SMS PASSCODE RADIUS Protection component is enabled for the corresponding CRP in column (A). A selected or cleared checkbox indicates that the SMS PASSCODE RADIUS Protection component is enabled or disabled, respectively. The SMS PASSCODE RADIUS Protection component is enabled by default for all CRPs. This also applies to new CRPs, if you create such later on. Select the checkbox in a specific row to enable SMS PASSCODE RADIUS Protection for the CRP listed in column (A). All RADIUS authentication requests made through such a CRP are handled by the SMS PASSCODE NPS extension, allowing for SMS PASSCODE multi-factor authentication. Clear the checkbox in a specific row to disable the SMS PASSCODE RADIUS Protection component for the CRP listed in column (A). All RADIUS authentication requests made through such a CRP will be handled by the NPS default functionality. |
(C) | When maintaining SMS PASSCODE RADIUS Protection settings, you can maintain default settings, which will apply to all CRPs by default. However, it is possible to apply specific settings to selected CRPs, if this is needed, for example in order to handle different requirements for different RADIUS clients. Column (C) indicates, whether the corresponding CRP of column (A) has been configured to use default settings (marked with an “X”) or to use specific settings (marked with an empty cell). |
(D) | Click the Edit… button in column (D) to edit the SMS PASSCODE RADIUS settings for a specific CRP. This allows you to define CRP-specific settings for the CRP listed in column (D), or to revert the CRP back to default settings again. |
(E) | Click the Edit default settings… button to edit the default settings, i.e. the settings that apply to all CRPs with an “X” in column (C). |
When clicking the edit buttons (D) or (E), a new window will open, which allows you to configure the CRP-specific settings or default settings, respectively:

As shown, the window contains the following controls at the top of the window:
| Explanation |
(A) | Authentication: This tab contains settings that affect the authentication behavior of the RADIUS Protection component. |
(B) | Miscellaneous: This tab contains miscellaneous settings of the RADIUS Protection component regarding text encoding, end-user IP address collection, challenge/response behavior and more. |
(C) | Inherit default settings This checkbox is only visible, when editing CRP-specific settings. Clear the checkbox to override the default settings and set CRP-specific settings. Select the checkbox to inherit the default settings, meaning any changes to the default settings will also apply to the CRP in question. |
RADIUS Authentication Settings
The Authentication tab contains several settings that allow modification of the standard authentication flow of the SMS PASSCODE RADIUS Protection component. The standard authentication flow, defining the flow with all settings set to their default values, is defined as follows:
Standard Authentication Flow
- An Access Request packet containing a username and a password is received from a RADIUS client.
- The NPS extension resolves the user, i.e. checks whether the user can be found in USS . If the user cannot be determined (uniquely), then access is denied.
- The NPS extension checks, whether the user is allowed to log in, for example that the user has not been locked out in USS. If the user is not allowed to log in, then access is denied.
- The password is verified using the configured password provider. By default, this means using Windows Authentication (either a local Windows user or an AD user). In this case, access is denied, if any of the following conditions are true:
- The user password is incorrect.
- The user is locked out or denied access.
- The user password has expired.
- The user password has been flagged “Must change at next logon”.
- Internal NPS logic is skipped. (I.e. all authentication and authorisation settings of the active Connection Request Policy and all settings of the Network Policy are ignored)
- Now multi-factor authentication is performed according to the user’s settings in the SMS PASSCODE database. Normally this will mean that a random OTP is generated and sent to the user, and a Challenge Request is sent back to the RADIUS client.
- The user receives the passcode and enters it. The RADIUS client forwards the passcode as a Challenge Response to the RADIUS server.
- The RADIUS server The RADIUS server verifies, whether the passcode received is valid or not, resulting in either an Access Accept or Access Reject packet being sent back to the RADIUS client, respectively.
If required, you can modify the individual steps of the Standard Authentication Flow.
The Authentication tab contains the following settings:
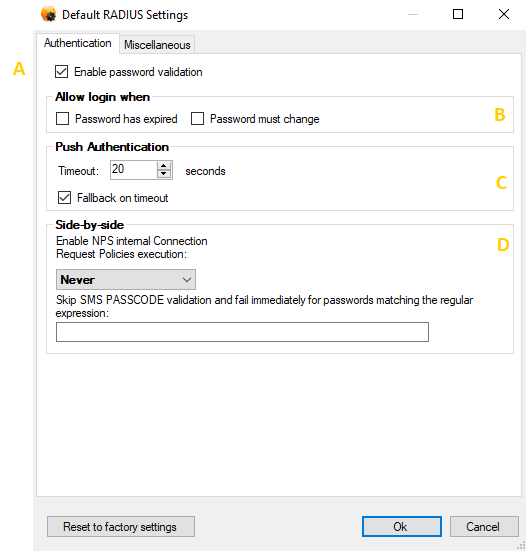
The settings have the following purposes:
a. Enable password validation
This setting defines whether password validation must occur at all. By default, it is enabled. Clear the checkbox to skip step 4 of the Standard Authentication Flow. In this case, no password validation will be performed, unless internal NPS logic is enabled (cf. item e below).
b. Allow login when
This setting controls the behaviour of steps 4c and 4d of the Standard Authentication Flow. By default, the SMS PASSCODE RADIUS Protection component will reject an authentication attempt from a user using an expired password or using a password that has been flagged “must be changed at next logon”. However, you can change this behaviour. This might make sense when a user is requesting remote access using a VPN connection. In this case, it might be acceptable to give the user network access and, in this way, allow the user to renew/change the password. Password has expired: Select this setting to allow successful authentication with a password that has expired. Password must change: Select this setting to allow successful authentication with a password that has been flagged “must change at next logon”.
c. Push Authentication
This setting controls the authentication behaviour, when IntelliTrust™ risk-based authentication is active, and the outcome of the risk engine is to use Push Authentication as the first priority. In this case, the default behaviour of the RADIUS server is the following:
- When an Access Request package is received from the RADIUS client, the RADIUS server will immediately forward a Push Authentication request to the end-user’s mobile app (via the IntelliTrust™ cloud service).
- The RADIUS server will not send any package back to the RADIUS client, until either a) The user has reacted and either confirmed or rejected the push authentication, or b) a timeout of 120 seconds occurs. In case the user reacted before the timeout with a push authentication confirmation or rejection, an Access Accept or Access Reject package is returned to the RADIUS client, respectively.
- In case the 120 second timeout occurred, the RADIUS server will fail over and send an Access Challenge back to the RADIUS client, asking the user to authenticate using the next authentication mechanism in the prioritised list of authenticators that resulted from the evaluation of the risk engine. If no such failover authentication mechanism was configured in the IntelliTrust™ risk engine, then an Access Reject is returned instead.
A potential issue with the default Push Authentication behaviour is that the RADIUS client might not want to wait for up to 120 seconds to receive a package back from the RADIUS server. It might have been configured to abort the authentication session before 120 seconds have elapsed. If possible, it is recommended to re-configure the RADIUS client to wait up to 120 seconds, before aborting the authentication session. Otherwise, it is recommended to change the Timeout setting to align it with the RADIUS client behaviour. However, please take into consideration that the end-user should be given enough time to actually open the Push Authentication app and confirm/reject the Push Authentication request.
If you do not want the RADIUS server to fail over to a secondary authentication mechanism on Push Authentication timeout, then please clear the checkbox Fallback on timeout.
d. Side-by-side
This section contains settings that define how the SMS PASSCODE RADIUS Protection component will interact with the internal NPS logic. This is an advanced topic, and changing these settings is typically only required, if you need to set up a side-by-side scenario, where users can log in either using SMS PASSCODE or another RADIUS authentication system. However, changing the settings can also be required in other cases, where the internal NPS logic is required, e.g. if you would like to make use of the functionality provided by NPS through Connection Request Policies or Network Policies.
The following abbreviations are used below:
- CRP: Connection Request Policy
- NP: Network Policy
- NPS IL setting: The setting called “Enable NPS internal Connection Request Policies execution” in the Side-by-Side section. “IL” is an abbreviation for “Internal Logic”.
- SVF setting: The setting called “Skip SMS PASSCODE validation and fail immediately for passwords matching the regular expression” in the Side-by-Side section. “SVF” is an abbreviation for “Skip Validation and Fail”.
The possible options for the NPS IL setting are:
NPS IL setting | Description |
Never | The SMS PASSCODE RADIUS component takes full control of the authentication and performs a standard SMS PASSCODE multi-factor authentication. All internal NPS logic is skipped (as described in step 5 of the Standard Authentication Flow). This means that any authentication and authorization settings of CRPs, and/or any settings of NPs will be ignored. This is the default setting. |
Always | Step 5 of the Standard Authentication Flow is changed. Instead of skipping, authentication is now forwarded to the internal NPS logic. I.e. CRP and NP settings will be applied. This means, that if the CRP is set to perform an authentication or is set to forward authentication to another RADIUS server, then this will be executed. Access is denied, if any CRP/NP logic denies access, e.g. because authentication according to the CRP fails, or because access is not allowed according to the NP. Otherwise, authentication will continue at step 6 of the Standard Authentication Flow. |
On failure only | First steps 1-4 of the Standard Authentication Flow are executed normally. If the user has not been denied access so far, then the Standard Authentication Flow continues as defined by default. I.e. the same behavior is achieved, as when the NPS IL setting is set to Never. However, if the user is denied access during any of the steps 2-4, then the internal NPS logic will be executed, and the remaining part of the Standard Authentication Flow will be skipped. In other words, CRP and NP settings will be applied. Access is denied, if any CRP/NP logic denies access, e.g. because authentication according to the CRP fails, or because access is not allowed according to the NP. On the other hand, if the user is allowed to log in according to the CRP/NP settings, then the user is granted access immediately, i.e. no multi-factor authentication by SMS PASSCODE occurs in this case. When selecting the option On Failure only, never set the CRP to allow access without validating credentials. This would grant access to users without any validation at all |
Miscellaneous RADIUS Settings
The remaining SMS PASSCODE RADIUS Protection settings are collected on the Miscellaneous tab:
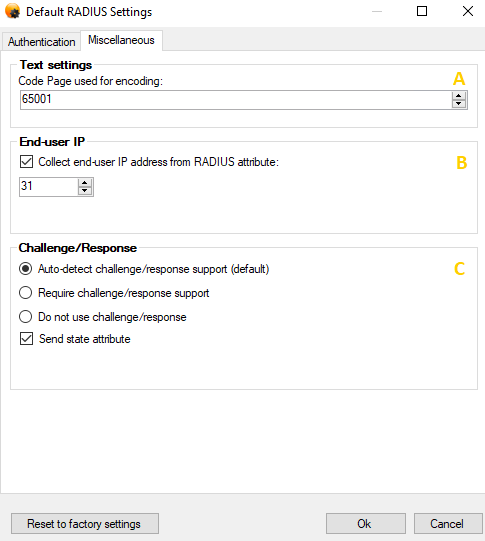
The settings are explained below:
a. Text settings Code Page used for encoding: This setting specifies the Windows Code Page used for encoding input texts, i.e. usernames, passwords and passcodes. If the RADIUS client uses a specific code page, please ensure to enter the same code page here. For example, many Cisco VPN clients use code page 1252. If the code page of the RADIUS client and RADIUS server do not match, you might experience authentication problems for users using special characters in their username or password.
b. End-user IP
This setting allows you to configure, whether SMS PASSCODE RADIUS Protection must collect the end-user’s IP address from a specific attribute of the RADIUS Access Request packet. To enable this, select the checkbox Collect end-user IP address from RADIUS attribute, and then enter the number of the RADIUS attribute that contains the end-user IP. Besides being useful for authentication monitoring, collecting end-user IP addresses is also useful in order to enable location and behaviour aware authentication for even stronger security. Please read section 16.1 (page 96) to get a short overview about this topic.
c. Challenge/Response
SMS PASSCODE RADIUS Protection supports both RADIUS clients that support or do not support challenge/response. By default, when the first request is received from a RADIUS client after the NPS has started, the SMS PASSCODE NPS extension will auto-detect whether the RADIUS client supports challenge/response or not. If the client does not support challenge/response, then SMS PASSCODE authentication is performed in two steps: first validating the user password in a first RADIUS authentication and then validating the SMS PASSCODE in a second RADIUS authentication. This means a non-session-specific multi-factor authentication is performed; opposite to a challenge/response multi-factor authentication, which will always be session-specific.
If you do not wish to allow the auto-detection mechanism described above, you can customise the behaviour, by selecting the appropriate setting:
- Auto-detect challenge/response support: this is the default behaviour, as described above.
- Require challenge/response support: auto-detection is disabled. Only RADIUS clients supporting challenge/response will be able to authenticate successfully.
- Do not use challenge/response: auto-detection is disabled. Challenge/response is never used. Instead, all authentications are performed in two steps, using non-session-specific multi-factor authentication.
According to the RADIUS RFC, all RADIUS challenge packets should contain a state attribute (which is a session identifier). However, some RADIUS clients seem not to support this state attribute correctly. In case you experience this, you can clear the Send state attribute setting, which will force SMS PASSCODE Protection not to insert the state attribute. Clearing the setting is NOT recommended unless it is required.
Since you can customise different settings per CRP of the NPS, this allows you to define different settings for different CRPs – for example collecting end-user IP addresses from different RADIUS attributes for different RADIUS clients.
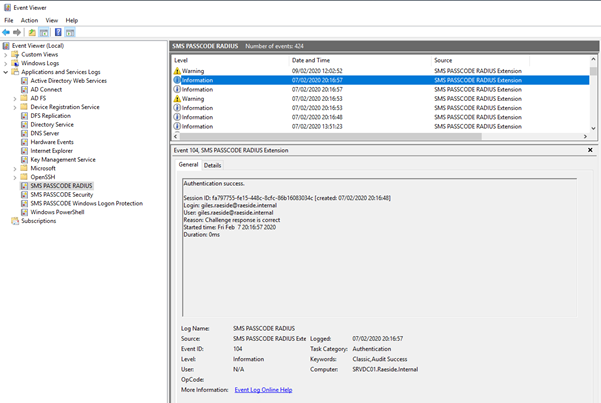
Troubleshooting
The Event log SMS PASSCODE Security shows if there has been an error with the authentication process such as the users is not enabled for Cloud MFA.
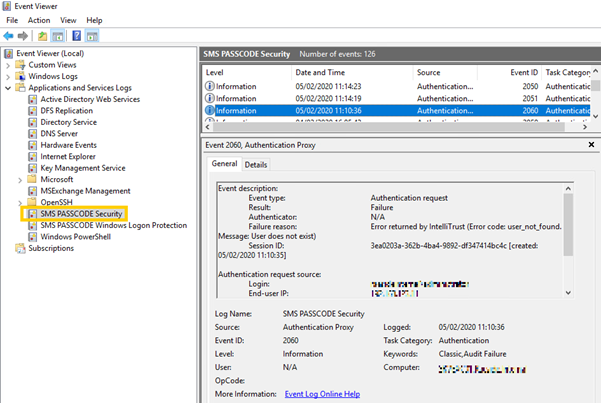
The Event log SMS PASSCODE RADIUS shows if the user's request has been accepted or denied by NPS.