Importing an SSL Certificate into the USS Gateway
![]() Updated 2 years ago
by
admin
Updated 2 years ago
by
admin
The Cloud Gateway uses the industry-standard OpenSSL certificate libraries, which are maintained by Ubuntu, and on very rare occasions the libraries may be missing a Root or Intermediate certificate signed by the certificate authority (CA). If the below message has been displayed to a user via the Cloud Gateway, then the website the user has connected to is using a certificate that has been signed by a CA that is not installed Cloud Gateway.
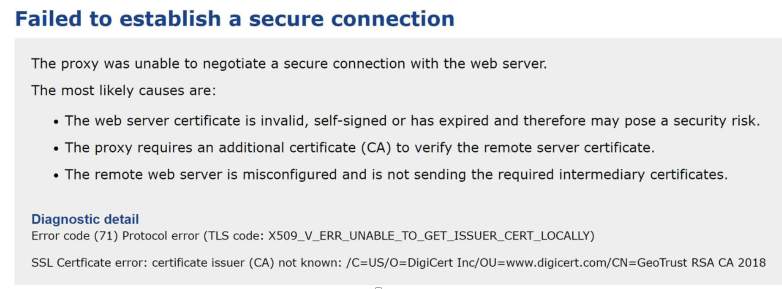
There are two approaches to resolving the problem. Before you begin, download a copy of the required certificate from the root CA provider. The provider is detailed in the Diagnostic Detail section, for example in the screenshot above the last line indicates it is missing the certificate named GeoTrust RSA CA 2018. Most certificate issuers will have a website where you can download that exact certificate from after searching for the certificate name. In this case, the certificate can be found at https://www.digicert.com/digicert-root-certificates.htm
Solution Method 1
- Once you have the required certificate use WinSCP (or similar) to copy the certificate onto the Cloud Gateway server. Place the file in the
/tmpdirectory as this directory will not present permission problems when uploading (you will need to use the command line administrator account you created during the installation of the gateway to access the server with WinSCP). - Once the file has been copied to
/tmpconnect to the Cloud Gateway via Putty (or similar) and login with the credentials again, then switch to the root account by typing:sudo su.When prompted, enter the password again. - Now move the uploaded certificate file to /usr/local/share/ca-certificates. To do do this type the following command:
mv /tmp/<name_of_certificate> /usr/local/share/ca-certificatese.g mv /tmp/GeoTrustRSACA2018.crt /usr/local/share/ca-certificates where GeoTrustRSACA2018.crt is the certificate you are importing. - Next, update the certificate store so that the operating system loads the new certificate file, by typing:
update-ca-certificates --fresh - Now restart the proxy service (note: this will interrupt web browsing for any connected users) by navigating to System -> Restart Proxy in the Gateway user interface:
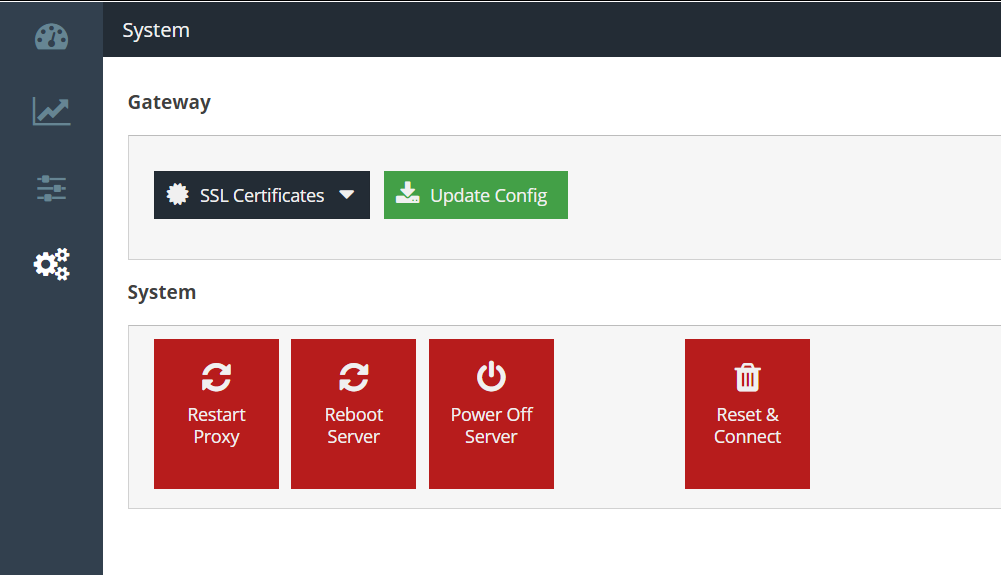
Alternatively, you can reboot the proxy by typing reboot at the command line or using the Reboot Server button in the Gateway user interface.
- Re-test the web site and the certificate warning should no longer be displayed.
Solution Method 2
Try this alternative approach if you have problems with Solution Method 1 above.
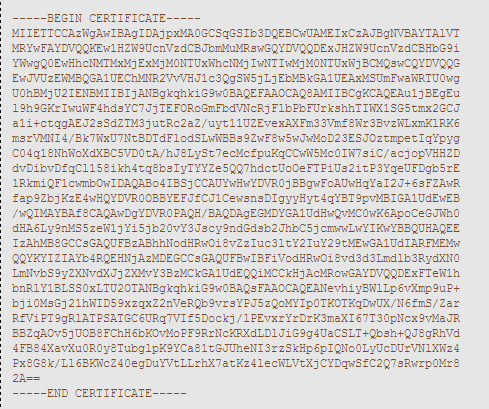
The contents of the certificate file you downloaded above when opened in a text editor:
- Log into your USS Gateway server via Putty (or similar) and use the command
sudo suto become root user - Run the command
cd /tmp- this will take you to tmp folder - To create the certificate file, run nano certname.crt (replacing certname with a name you want to give it - in this process the name can be anything, as long as it ends in .crt)
- Copy and paste the content of the certificate (as shown n the example above) into the file (including BEGIN and END CERTIFICATE), and hit Ctrl-X to save
- Now run
cp /tmp/certname.crt /usr/local/share/ca-certificates (replacing certname.crt with the name of the file you created in step 3) This will copy the certificate to the Ubuntu certificate store. - Run the command
update-ca-certificatesto update the store with the newly imported certificate - Now restart the proxy service (note: this will interrupt web browsing for any connected users) by navigating to System -> Restart Proxy in the Gateway user interface:
Alternatively, you can reboot the proxy by typing reboot at the command line or using the Reboot Server button in the Gateway user interface.
- Re-test the web site and the certificate warning should no longer be displayed.