Web Security: Product Configuration
 Updated 1 hour ago
by
admin
Updated 1 hour ago
by
admin
Browse has a number of global settings that affect how it behaves. To access them, log in to the console and go to Browse ⟶ Module Settings (previously Product Configuration). The page has three tabs: General, Tags and Templates.
General
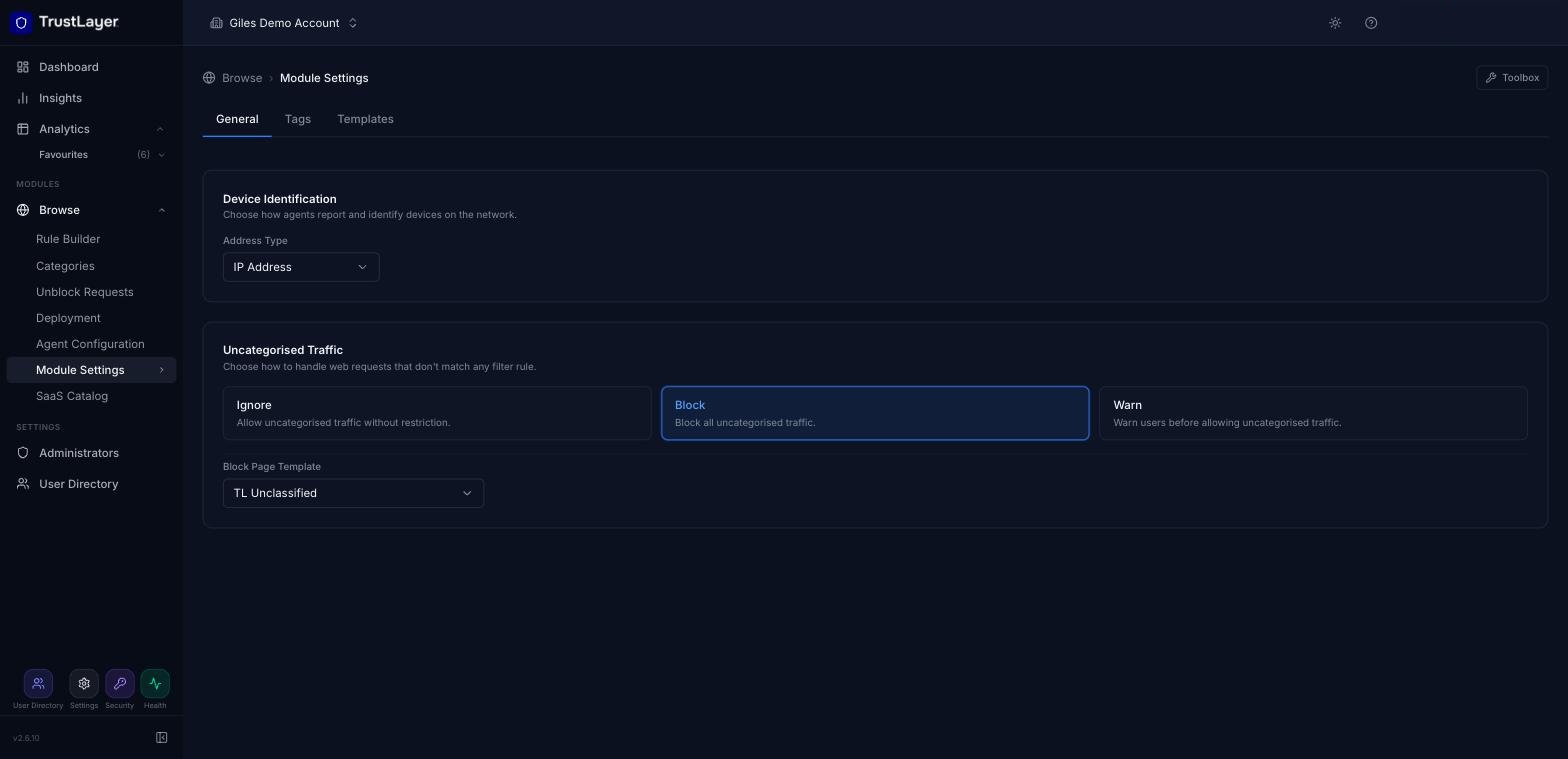
Device Identification ⟶ Address Type
When the Device condition is used in rules, this setting decides whether the MAC Address or IP Address is used to resolve devices to names.
Uncategorised Traffic
Decides how to handle sites that aren't categorised in the system Web Category database or your Custom URL categories:
- Ignore: allow uncategorised traffic without restriction.
- Block: block all uncategorised traffic.
- Warn: warn users before allowing uncategorised traffic.
Learn more about Unclassified Site Processing.
Block Page Template
If uncategorised traffic is blocked, choose the template to show on the blocked page.
Tags
Tags (Module Settings ⟶ Tags) are applied to Agents in order to identify sources of web traffic. For example, you may want to tag a Gateway agent with its location e.g. Head Office, London, New York and then use the tag as part of a rule condition. Tags are essentially text strings that can be used to apply policy controls to one or more agents.
Creating tags
On the Tags tab, click Add Tag, enter the name for the new tag and save it.
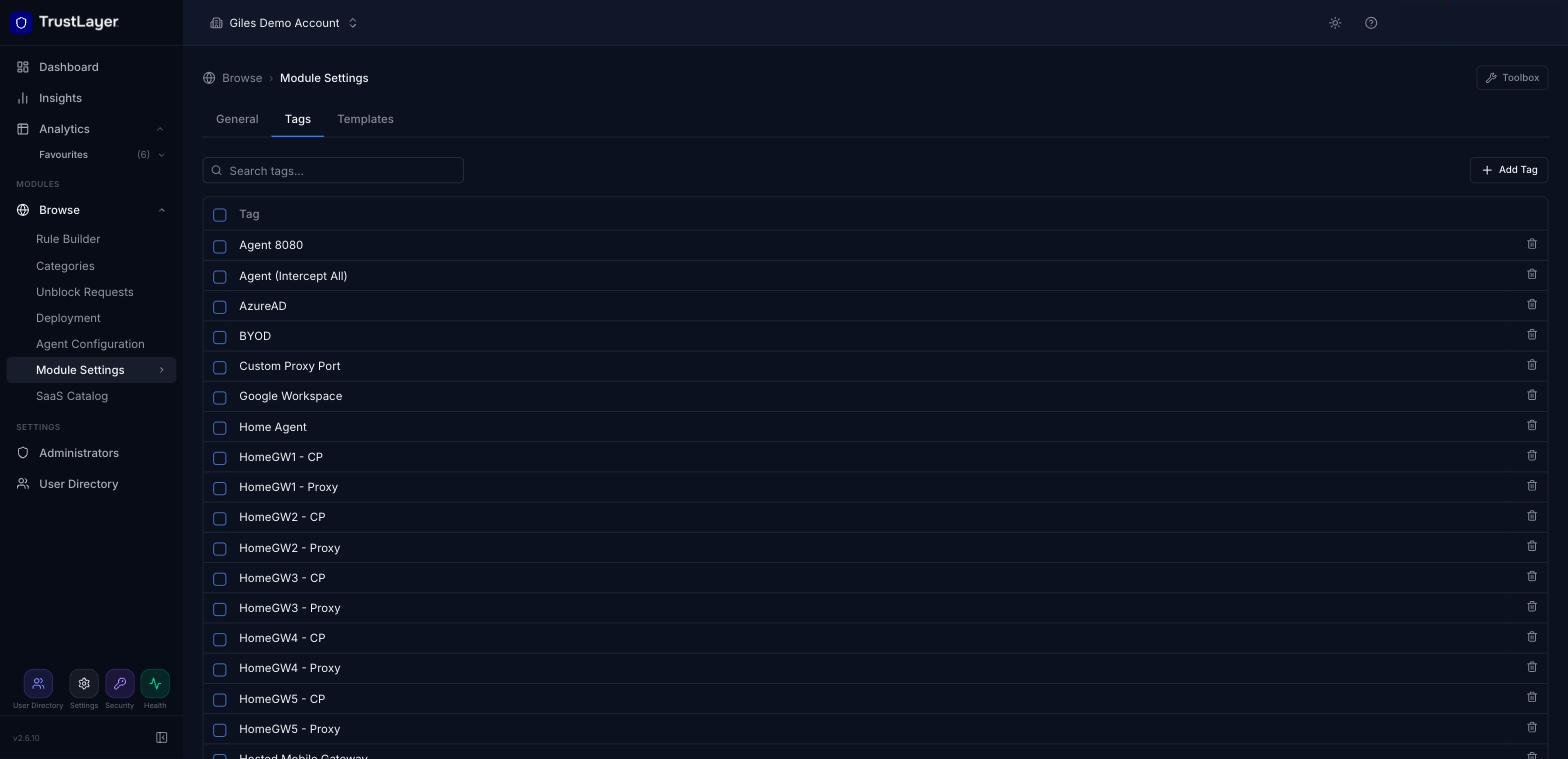
The new tag can now be applied to agents in Agent Configuration profiles (Tag Web Requests With) and used in the Tag condition in the Rule Builder.
Managing tags
Use Search tags to find a tag. To remove a tag, click the delete (bin) icon at the end of its row.
Templates
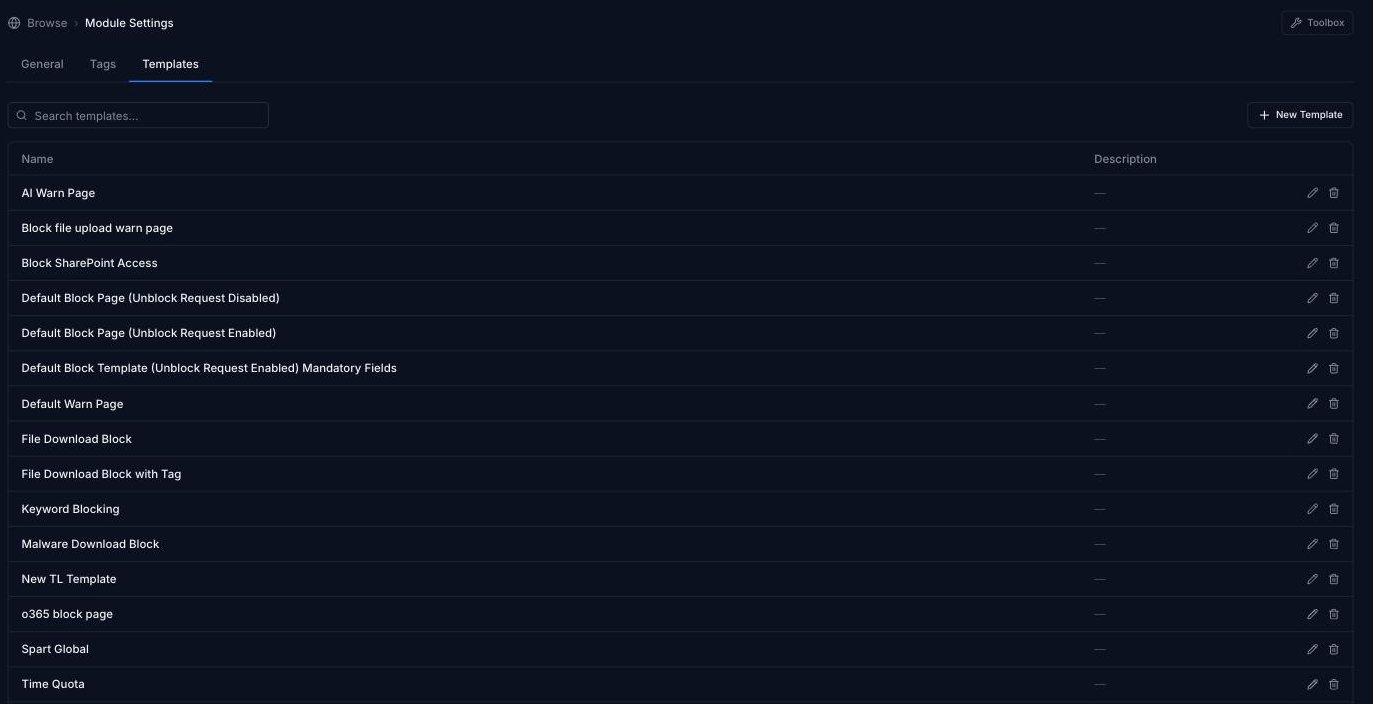
Browse uses templates (Module Settings ⟶ Templates) to display different pages as a result of rule actions in the Rule Builder, such as Block and Warn. Templates provide extreme flexibility, allowing you to use your own HTML/JavaScript to present messages to your users. However, for simplicity, it is also possible to select from a system template.
Adding a template
- On the Templates tab, click New Template.
- Enter a memorable Name and an optional Description.
- To start from a system template, choose one from Copy from system template.... This loads it into the editor, where you can make changes, including adding and removing placeholders that insert content into the page dynamically.
- Edit the page in the Code view (HTML) or the Visual view. You can use Beautify, Minify and Full screen in the code view.
- Click Save.
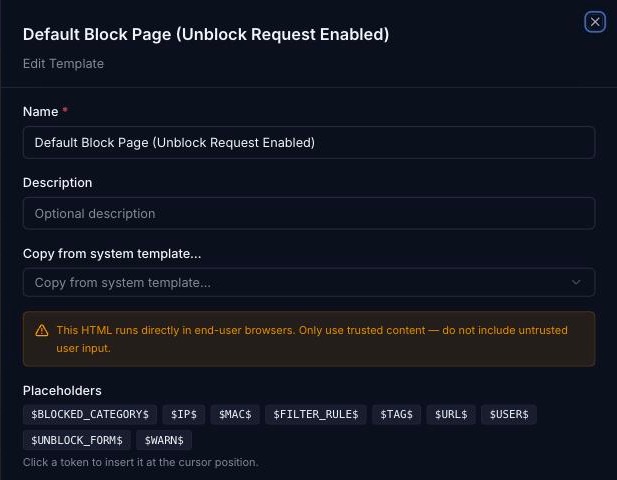
You can also paste HTML from a document created elsewhere. If you are using your own custom HTML you will almost certainly want to include some Template Placeholders.
The template is now available in the settings of the Block, Warn and Content Scan actions in the Rule Builder, and anywhere else a template is chosen.
Managing templates
To edit a template, click the pencil icon at the end of its row. To delete it, click the bin icon (or Delete in the edit panel).
Template Placeholders
Template placeholders are special pieces of text, identified by starting and ending with a $ sign, that are rewritten with information dynamically to make the template more useful. The following placeholders are available:
Placeholder Description
Placeholder | Description |
| In the case where a filter rule uses the Web Category or URL Category match option, this placeholder will be replaced with the real category name e.g. News, Malware |
| The IP address of the device that triggered the final action that uses the template |
| The MAC address of the device that triggered the final action that uses the template |
| The name of the rule that triggered the final action that uses the template |
| The tag associated with the agent that triggered the final action that uses the template |
| The URL that was being accessed when the final action was triggered that uses the template |
| The username that triggered the final action that uses the template |
| Display an Unblock Request form so that the user can request the site to be unblocked directly from the block page template |
| Display a Continue button so that a user can access a blocked page when used in conjunction with the "Warn" final action. |
In the template editor, click a placeholder under Placeholders to insert it at the cursor position, without having to type it.
Advanced Template examples
Custom Request Unblock Button
You can use the element ID unblock-request-btn to override the style of the Unblock Request button or class name flat-button to override the style of all buttons.
For example, add this style override somewhere inside the <style> tag of the template HTML:
#unblock-request-btn {
    color: white;
    background-color:green;
    border-radius: unset;
    border-bottom:0px;
    box-shadow:unset;
    -webkit-box-shadow:unset;
    text-shadow:unset;
}
This will change the default style to be a green button with white text and no shadow effect.
Multiple-language Block page
The following example uses JavaScript to detect the browser language and alters the message content appropriately. It is based on the system template, "Default Block Page". To use it, copy and paste the below code into the Source Editor:
<!DOCTYPE html>
<html>
<head>
<meta http-equiv="content-type" content="text/html; charset=utf-8">
<meta name="viewport" content="width=device-width, initial-scale=1.0">
<meta http-equiv="X-UA-Compatible" content="IE=edge">
<title>
</title>
<style>body{margin-top: 0px; margin-bottom: 0px; margin-left: 0px; margin-right: 0px; padding: 0; background-color: #e74c3c; color: #FFFFFF; font-family: "Myriad Pro", "Trebuchet MS", "Helvetica Neue", "Frutiga", Helvetica, Arial, Sans-Serif; font-size: 1.1em;}.title{font-size: 2.2em; padding-bottom: 10px; line-height: 40px;}a{color: #FFFFFF; text-decoration: none;}.row-white{background-color: #FFF; color: #000; height: 80px;}.row-red{background-color: #db4334; color: #FFF; height: 100px;}.custom-logo{padding-top: 6px; padding-right: 3px; max-height: 65px; padding-bottom: 3px;}.block-logo{padding-left: 3px; padding-top: 10px; padding-bottom: 10px; height: 80px;}.top_border > td:nth-child(2){border-top: 1px #fff solid;}
</style>
</head>
<body>
<div class="" style="">
<div class="span8 offset2">
<div class="pull-right" style="min-height: 50px;background-color: #fff">
</div>
</div>
</div>
<div class="row-red">
<div align="center" style="width: 100%;">
<div style="width: 50%;" align="left">
<img class="block-logo" src="//portal.clouduss.com/assets/blockpages/error.png">
</div>
</div>
</div>
<div align="center" style="width: 100%;" class="row-fluid row-content">
<div style="width: 50%; margin-top: 50px;" align="left">
<div class="title">
<div id="blocktitle">
</div>
</div>
<div id = "blockmessage">
</div>
</div>
</div>
<div align="center" style="width: 100%;" class="row-content">
<div style="width: 50%;" align="left">
<div id="more_details_panel" style="padding-top: 15px;" class="span6">
<table cellspacing="5" style="margin-left: 50px; background-color: #e74c3c;">
<tbody>
<tr>
<td style="width: 25px;border-top: 0px!important;">
<img src="//portal.clouduss.com/assets/blockpages/url-white.png" style="width: 20px; height: 20px;"> </td>
<td style="border-top: 0px!important;">$URL$</td>
</tr>
<tr class="top_border"> <td>
<img src="//portal.clouduss.com/assets/blockpages/user-white.png" style="width: 20px; height: 20px;"> </td><td>$USER$</td>
</tr>
<tr class="top_border"><td>
<img src="//portal.clouduss.com/assets/blockpages/device-white.png" style="width: 20px; height: 20px;"> </td><td>$IP$ - $MAC$</td>
</tr>
<tr class="top_border"><td>
<img src="//portal.clouduss.com/assets/blockpages/module-white.png" style="width: 20px; height: 20px;"> </td><td>$FILTER_RULE$</td>
</tr>
<tr class="top_border"><td>
<img src="//portal.clouduss.com/assets/blockpages/category-white.png" style="width: 20px; height: 20px;"></td><td>$BLOCKED_CATEGORY$</td>
</tr>
</tbody>
</table>
</div>
</div>
</div>
<script type="text/javascript">
var userLang = navigator.language || navigator.userLanguage;
userLang = userLang.substring(0, 2);
switch (userLang) {
case "de":
var blockmessagetext = "Der Zugriff auf diese Webseite wurde aufgrund der Webfilter Richtlinien blockiert. Sie können den Zugang zu dieser Seite beim Systemadministrator anfordern. ";
var blocktitletext = "Der Zugriff auf diese Seite wurde blockiert";
document.title = "Zugriff verweigert";
break;
case "fr":
var blockmessagetext = "Ce site web est actuellement bloqué par votre organisations politiques de filtrage Web. Vous pouvez demander l‘accès a ce site de l‘administrateur du système. ";
var blocktitletext = "La page demandée a été bloqué";
document.title = "accees refuse";
break;
default:
var blockmessagetext = "This web site is currently blocked by your organisations web filtering policy. You may request access to this site from the system administrator.";
var blocktitletext = "The requested page has been blocked";
document.title = "Access Denied";
break;
}
document.getElementById("blockmessage").innerHTML=blockmessagetext;
document.getElementById("blocktitle").innerHTML=blocktitletext;
</script>
</body>
</html>
Unblock Request button bypasses the form and auto-submits
Add this to the top of the template with an $UNBLOCK_FORM$ tag:
<script>
    function doload() {
        document.getElementById('unblock-request-btn').onclick = function() {
            document.getElementById('unblock-form').submit();
        };
    }
</script>
Alter the <body> tag to
<body onload="doload();">
Make the e-mail address and reason required fields on the unblock form
Add this to the top of the template with an $UNBLOCK_FORM$ tag:
<script>
    function doload() {
        var labels = document.getElementsByClassName('unblock-form-label');
        labels[0].innerHtml = "E-mail address (required):";
        labels[1].innerHtml = "Unblock reason (required):";
        labels[0].innerText = "E-mail address (required):";
        labels[1].innerText = "Unblock reason (required):"
        var emailField = labels[0].nextSibling.nextSibling.nextSibling;
        var reasonField = document.getElementById('unblock-reason');
        document.getElementById('unblock-send-request-btn').onclick = function() {
            if (emailField.value.length === 0) {
                alert("You must enter an e-mail address");
                return false;
            }
            if (reasonField.value.length === 0) {
                alert("You must enter a reason for the unblock request");
                return false;
            }

            document.getElementById('unblock-form').submit();

        };
    }
</script>
Alter the <body> tag to
<body onload="doload();">
Add a timestamp to the page template
Add the following <script> block within the <head> tag of the template HTML. Note that you can change the locale from en-GB to suit your region, e.g. en-US, es-ES, etc
<script>
        function renderDateTime() {
            var dateTimeStr = new Date().toLocaleString('en-GB');
            document.getElementById('datetime').innerHTML = dateTimeStr;
        }
        </script>
Alter the <body> tag to
<body onload="renderDateTime();">
At the point in the template where you want to display the date and time, paste this tag:
<p id="datetime" style="font-weight: 600;"></p>